The Marketing Manager’s 10 Step Guide to Website Design
Is your current website a little worse for wear? Perhaps it resembles something straight out of the 90s?

The recent Captain Marvel’s movie website looks like it was built in the 90’s. That was their intention! The movie is set in 1995, so the website echoes the style of that time!
Or maybe you just don’t have a website yet!
Whatever your current site situation is, the steps we've put together in this guide will help you and your team create a website with an enjoyable experience that ultimately converts more visitors. Just remember an effective website is more than just pretty!
Ready? Cool, let’s dive in...
Summary
Step 1: Analyse your website performance
Step 2: Determine your website goals
Step 3: Develop buyer personas
Step 4: Write a website brief
Step 5: Find the right website designers & developers
Step 6: Request a website scope
Step 7: Create quality copy for site wireframes
Step 8: Let the web design begin!
Step 9: Let the web developers work their magic!
Step 10: Make continuous site improvements
Start your website design or redesign today!
Step 1: Analyse your website performance
If you already have a site, start here. If not, skip ahead to step 2!
Before you set about redesigning your site, you need to evaluate what’s working and what’s not on your existing site. This can feel like a daunting task, especially if you have a site that has a ton of pages. Fear not! We’ll help you break it down into bite size chunks so you can get it done effectively and timeously.
Analyse your website’s analytics
First off, we’re going to dive into your website’s data and analytics. This will give you insight into what your current visitors are doing, what content they like, where they come from, and a lot more. We use Google Analytics.
If you don’t have an analytics service set up on your site yet, no sweat, just skip this part of the guide. However it’s not too late to install a service so you can start tracking data. That way when your new site is up and running you can start comparing results.
How do users interact with my site?
1. Open your website analytics and navigate to Audience: Overview.
2. Start by choosing a date range. It’ll be worthwhile to note key data for various months so you can compare how your data fluctuates over time.
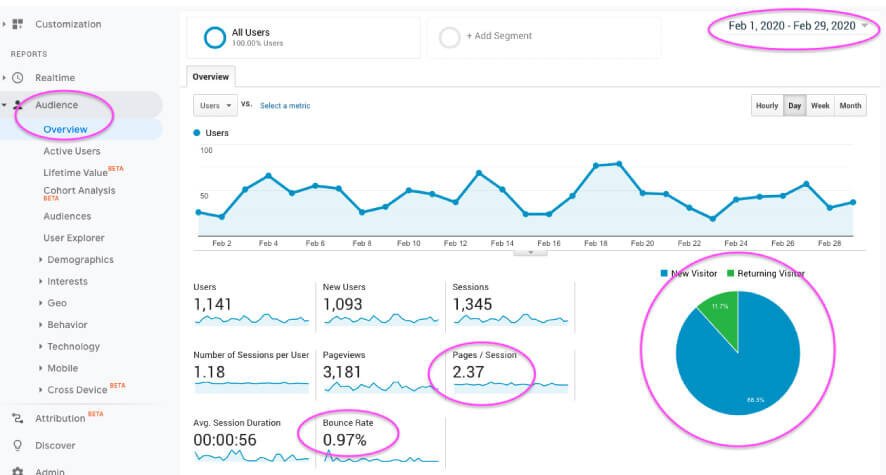
3. Now let’s take a look at the following numbers:
New Users
These are first-time users or visitors. We all want new customers, right? So it’s positive if this increases overtime.
Returning Users
These are users that have visited your site before. You may want this number to increase over time especially if you own an e-commerce store!
Bounce rate
This is the percentage of users that leave your site without visiting another page. A high bounce rate (more than 70%) shows that your site isn’t keeping your visitors engaged, while it’s also a bad sign when your bounce rate is too low (less than 10%). If it’s too low there may be an issue with how your analytics has been set up. A healthy bounce rate is about 40 - 60%.
Pages/Session
The average number of pages per session shows how many pages a user engages with during a period of time. Aim for at least 2 pages or more per session!
4. Next let’s navigate to Audience: Mobile:
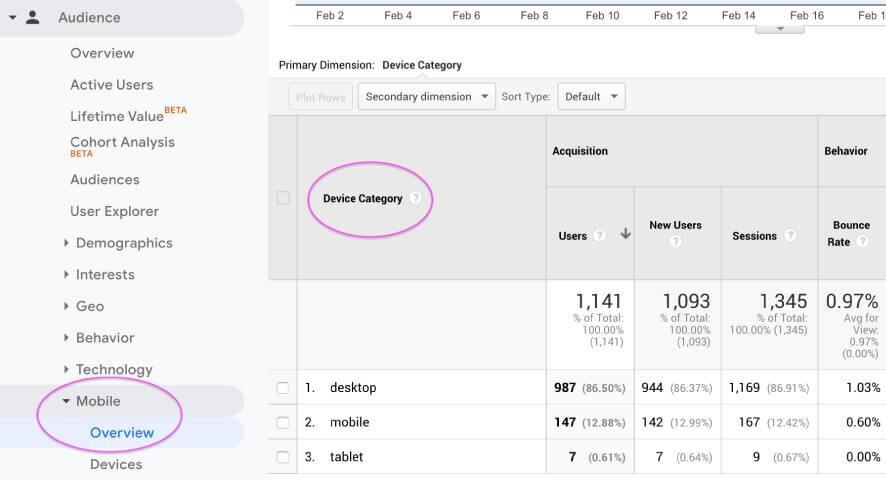
Here you’ll see how many users access your site on desktop, tablet and mobile devices. This is some useful information for your design team. For example, if your site gets views predominantly on mobile, designers may want to pay special attention to the mobile experience. That said, your site should still look amazing across all devices!
Are my users converting?
Every business defines a conversion as something different. You may count a converted user as someone who signs up, completes a purchase or submits a form. In Google Analytics you need to set a goal to count conversions.
If you haven’t set up any goals in Analytics, the time is now. Check out this article on how to go about it. If you have, navigate to Conversions: Goals and take note of the amount of Goal Completions, as well as your Conversion Rate. There are industry benchmarks but set targets that are realistic for you!
Content is king!
Now let’s take a look at your content. Look for All Pages under Behavior: Site Content. You’ll get a list of the pages viewed across your site. Take note of the pages that get the most attention. This will help you understand what content your users totally dig ;)

Analyse your website’s speed and accessibility
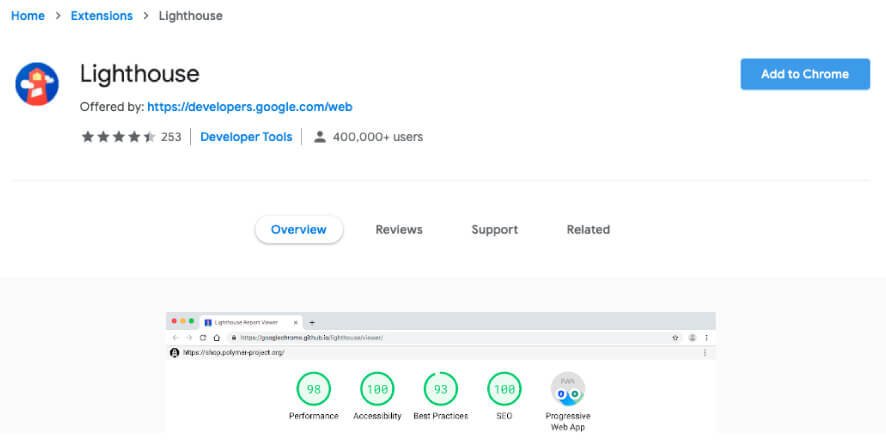
Search engines like Google love sites that perform well. The faster your site loads, or the more you cater for people with disabilities the more search engines will want to promote you. Google has a nifty little extension called Lighthouse that audits your website pages and then provides you with recommendations on how to optimise them.
To start you’ll need to add the Lighthouse extension to Google Chrome. Visit Lighthouse and select Add to Chrome.
Once you’ve installed the extension, go to the web page you want to test and locate the little lighthouse icon next to the address bar:
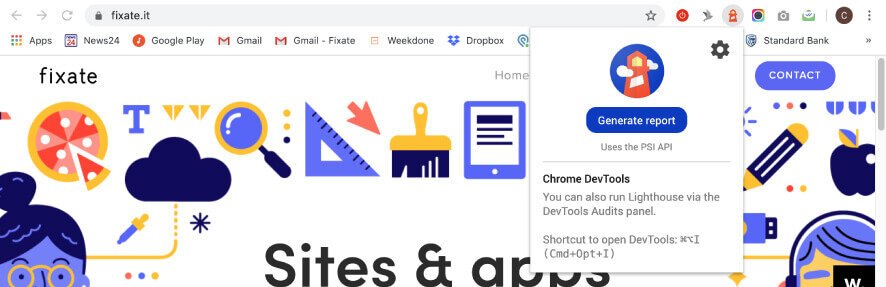
Hit generate report… wait a few seconds and then, tah-dah! You’ll get a neat little report that dives into the web page’s performance, accessibility, best practices and SEO. At the top of the page you’ll find your overall scores:

Now let’s dig a little deeper and unpack your performance and accessibility scores...
How well does my site perform?
Scroll down to the performance section of the report. These numbers show how fast your site loads. Take note of the following two numbers in particular:
Time to Interactive
This measures how long it takes for a page to become interactive (or “clickable”). The quicker your users can start interacting with your site, the better. According to Lighthouse a score between 0 and 5.2 seconds is considered fast!
Speed Index
This measures how long it takes for the visible parts of a page to load "above the fold" in your browser. “Above the fold” refers to the portion of the page a user can see without scrolling down. According to Google you want this to be under 3 seconds!
The lower your speed index, the better your website is performing. If your site is pretty content-heavy (eg. you’ve uploaded big files) above the fold, this may result in a poor speed index.
Now what?
These metrics are valuable to both you, and your design and development team. The data will also be a big help when setting your website goals. Giving your site a quick health check from time to time is a great way to ensure you keep improving your site’s performance and user experience.
Tips and tricks
Short on time? Various agencies offer professional UX reviews that dive into your data analytics, user experience and user interface design.
Step 2: Determine your website goals
You still with me? Cool! Why don’t you grab a cup of coffee and let’s talk goals!
In this step you’ll develop a clear set of goals that are tied to measurable results. This is where the data you’ve collected will come in handy. For example, if you already have a site, you may have found that you need to increase your leads, attract more users and so on.
Website design involves a lot of time and investment, so having measurable goals that you can look back on will prove that your investment was worth it.
Below are some questions that’ll help you start developing your goals:
What is the purpose of my website?
If you own a restaurant reservation service, your goal could be to help users make reservations for restaurants in your area.
What issues am I trying to fix with a new site?
If you already have a site this question is for you. An example could be your lead generation process; in other words, how you identify potential customers and cultivate a relationship with them.
Do I know of any pain points my customers are currently experiencing?
If you already have a site, your answer might be something like, “I know that my users struggle with the checkout process”. If you don’t have a site, a pain point could be something like, “I know my potential customers struggle to find local, organic produce”.
What do I want users to do when they visit my site?
You might want your users to sign up and subscribe to your services.
How best can I attract users and convert them into leads?
Perhaps you could offer a free resource in the form of a free trial, or useful download.
Who are my competitors, and what do I like or dislike about their sites?
The wise man learns from the mistakes of others. Fools learn from experience - Otto von Bismarck. Take the time to scour through your competitor sites and list what you think they’ve done well, and what you think could be improved.
What analytics do I want to improve?
If you already have a site this one's for you too. You might want to:
Increase number of visits per month
Reduce bounce rate
Increase number of pages per session
Increase total form submissions
Improve site speed score
Improve accessibility score
Now that you’ve jotted down some potential goals, change them into SMART goals. Here’s a quick example:
S – Specific: What do I want to accomplish?
I want to generate more leads by decreasing the number of form fields on my enquiry form.
M – Measurable: How can you measure progress?
I’d like a 50% increase in form submissions.
A – Achievable: Based on the evidence is this achievable?
We A/B tested a longer form vs a shorter form on our highest traffic landing pages. We saw that shorter forms convert 50% more than longer forms.
R – Relevant: Does this website goal compliment my business goals?
Yes! The more leads we get the more sales we can close!
T – Time-bound: What is a realistic goal deadline?
6 months from now
Your resulting goal should look something like this:
Six months from now, we’ll see a 50% increase in the number of successful form submissions by shortening our enquiry form.
Now it’s your turn. Grab your team and make this a fun exercise! Come up with a couple of relevant and attainable goals that you can eventually share with your marketing, design and development team.

Step 3: Develop buyer personas
Don’t have any personas representing your target customers? Don’t worry, I got you.
First off, what the heck is a buyer persona?
A buyer persona is a fictional character created to represent a set of users that’ll use a site, or product in a similar way. Companies can have one or more personas. Try to stick to 5 personas at the max.
How do buyer personas help?
They help you understand your users’ motivations and needs
They help you understand the obstacles or problems in your processes
They help you visualise who you are targeting with your marketing material
They help you use more suitable language, messages and imagery
What should a persona include?
Gather information about your target customers by reviewing your analytics, chatting to your sales team and, most importantly, interviewing your customers. Once you have enough information start putting together your personas.
Here are some common aspects a persona can include:
Name
Photo
Personal quote or motivation
Age
Gender
Education
Marital status
Children
Location
Company industry
Company Role
Company size
Goals
Challenges
How we can help

Step 4: Write a website brief
A stellar website brief will mean agencies get a clear picture of your design vision. Including the points mentioned below will allow agencies to provide you with a fair and accurate estimate:
What is your business all about?
Give an overview of your business.
What are your business goals?
Remember those SMART goals you put together in Step 2? Now it’s time to use them!
Who is your target market?
Time to show off those personas you created!
Who are your competitors?
Great! You have these too! Provide a list of your competitors and touch on what you think they’re doing right and what they’re doing wrong.
What look-and-feel would you like?
Are there any sites you’ve come across with designs that you like, or even dislike? Share links to them in your brief. Also add any additional requirements, such as whether you’d like your designers to source stock photography, enlist a professional photographer or create custom illustration.
Check out awwwards.com for some of the best sites out there, or take a quick look at our list of the Top 7 website design trends for 2020 for a little inspiration.
At this point it’s also good to let the agency know if you already have a corporate identity or if you’re open to a little brand refresh. If you need to start from scratch, the right agency should be able to help you create a brand identity that’s nothing short of awesome.
What are the technical requirements?
Here are some examples of site functionality requirements:
Search
Newsletter subscription
Blog
Blog comments
Social media feeds
Interactive map
Online bookings or payments
Your site may require sign ups and logins. If so, it’s important to unpack this in detail. For example: when logged in, what’s the user objective?
Also remember to indicate whether the site should integrate with any external feeds or API’s (Application Programming Interfaces), or if you’d like a template or custom solution. Don’t worry if you’re not sure about these things - your development team can always guide you.
Technical requirements can seem daunting, but don’t get bogged down by fancy language; just explain clearly how you think the site should work. It’s then up to the responsible team to suggest how best to go about it.
Do you have copy?
It’s important to let an agency know whether you’ll provide your site’s copy (i.e. text). If your site is a redesign, include what copy will stay, what’ll be removed, and what needs to be added. If you need help putting your copy together, indicate that in your brief.
What is your budget?
Good websites aren’t cheap. While it’s not always easy, try to view your website as an investment, not an expense. That being said don’t just throw dollar, dollar bills at the situation! Whatever you end up paying, you need to ensure that your site generates a high ROI.
Now this next tip might strike you as playing your cards a bit too open, but trust me - it’s the best way to get an accurate costing, and in many cases, some invaluable advice. Tell agencies what your budget is! That way, they’ll be able to tell you just how much bang you can get for your buck. If your budget doesn’t cover all the features you’d like to include, indicate which features are top priority. You could have a more phased approach to your website launch!
Define your timeline
You may have a timeline in mind, but remember an agency will be able to tell you just how long things can take. Don’t be afraid to suggest a deadline date though! Plans can often be made ;)
What is your selection process?
Last but not least, be transparent about the fact that you’re contacting multiple agencies. Indicate what you’d like the agency to include in their proposal, their proposal due date, when initial interviews will commence, and when a final decision will be made. This is a great way to start off on the right foot with your future design and development team.

Step 5: Find the right website designers & developers
The right team should be the macaroni to your cheese, bacon to your eggs, jelly to your doughnut… you get the picture! The agency you choose will ultimately make or break your website design, so choose wisely.
Instead of sending your brief to a bazillion agencies, do a little upfront due diligence to narrow the playing field. Come up with a list of criteria and cross off agencies that don’t cut it.
Here are some tips that’ll help you narrow down your search:
Does their work speak to you?
Do you like the agency’s design aesthetic? Have they worked on any projects you find especially impressive?
Where is the agency located?
We’ve worked with companies from around the world, so we have a lot of experience with long-distance relationships ;) If location is a factor, narrow your search to agencies in the correct area, but if location doesn’t matter, check that the agency has worked with clients across borders.
What kind of experience do they have?
Do you need an agency with specific industry expertise? If so, only send your brief to agencies that check that box.
What do their clients say?
Reviews and testimonials are often a great way of getting to know a potential partner. So take the time to check out what their past clients have to say. Just bear in mind that the feedback an agency chooses to display on their site is most likely cherry-picked, so it’s a good idea to look at external sources.
Next steps
Now that your list is narrowed down, you should have a good idea of which agencies you’d like to contact. Why not set up a quick chat on Skype or Google Hangouts to get an even better feel of who you’d like to work with.
Once you’ve found the right agency for you, the fun really begins!
Step 6: Request a website scope
Depending on the requirements of your site, this step may not be necessary. Your developers will advise whether a website scope is required or not.
What is a website scope?
Sometimes called a spec, a scope of work, a project specification - you name it! - a website scope is a document your agency partner puts together that outlines your site's goals, requirements, features, business rules and so much more.
Ensure all or most of the following are included in your website scope:
Project objectives
Project planning and research
Site structure
Features and technical specifications
Security protocols
Technology selection
Testing plan
Timelines
The website scope is a kind of hands-on reference for all parties involved in the project. It’s a great way to ensure everyone understands what needs to be done!
Step 7: Create quality copy for site wireframes
Quality copy is key
Creating copy for your website often feels like a headache. It can be sooooo time consuming! But believe me, you won’t be sorry if you pay special attention to it. Great writing helps inform, educate and drive user action. If you’re not too sure how to go about it, chat to your partner agency and they’ll be able to advise you.
If you’re up for the challenge, here are some tips to help you create more compelling copy:
Give your copy a personality
Remember those buyer personas you created? Your copy needs to speak their language. For example, if your typical customer is young and in college keep the language colloquial and perhaps add some current slang into the mix?
Lose the jargon
We often fall into the trap of using terms and phases in our writing that leaves our customers bewildered. Try keep the language you use simple and explain any industry terms you may use.
Emphasise your product or service benefits
Speak to your customers' pain points rather than listing a million features your product or services includes. Explaining how you can solve your customer’s problems will make purchasing more enticing and justifiable.
Make it scannable
According to the Nielsen Norman Group, people only read about 20% of the words on a web page. What does that mean? You’ve got to make your copy more scannable. Highlight certain parts of your copy so that visitors notice and gravitate towards it. Here’s how to make your content more scannable:
Use powerful headings and subheadings
Use bullet points
Write in shorter sentences and paragraphs
Don’t forget to proofread
There is nothing more unprofessional than copy that has loads of typos or grammatically incorrect sentences. So when you think you’re done, read it again and again and again. Then get someone else to read it!
Having your copy ready before wireframing begins is always a plus! It definitely helps create a smoother process, even if your copy is roughly put together. Need a few more copy tips and tricks? Check out our blog post: Website copy, no problem. Here are 5 things you need to know.

Time to wireframe!
Wireframing forms part of the user experience (UX) process. Don’t be alarmed when your designer shows you a bunch of web pages full of grey boxes, lines and mumbo jumbo latin text (if your copy isn’t ready that is)! Remember, wireframes aren’t meant to be pretty. Think of them as architectural blueprints outlining how your website's content, interface, and navigational elements will work together. Wireframes can be hand drawn or digitally created.
Wireframes help you and your team explore ideas, confirm scope and identify business requirements.
Here are some tips to help you review wireframes:
Remember to focus on functionality, not design
Don’t assume that the site will just be a coloured version of the wireframe
Walk through the wireframes in detail with your designer to ensure everything has been accounted for
Don’t be afraid to ask your designer to explain their decisions
Step 8: Let the web design begin!
Now that the site structure is in place, it’s time to get creative! This is when your team will start the UI design.
What is UI design?
UI design is short for “user interface design”. It’s what many people simply refer to as “web design”. UI design is where designers get their creative juices flowing. They work on elements like colour, typography and imagery to bring the personality of your site to life.
A well-designed interface adds to user enjoyment, and gives visitors a feeling of delight as they navigate through your website. According to Sweor, 75% of users determine the credibility of a business by its site design! So pay special attention to this step - it can make or break your online presence.
How do I review my site’s UI design?
When your designer is ready to hand over some initial designs for you to critique. Here are some tips that’ll help you review the designs effectively:
Does the UI make a good impression?
Your site has a couple of seconds to form a positive impression in the minds of your visitors. Ask yourself if the overall design makes your business look approachable, credible and trustworthy.
Does the UI fit your brand personality?
Ask yourself whether the web design is in line with your company ethos. Try to view the site almost like your 24/7 salesperson; does it communicate correctly to potential customers?
Is the design consistent?
Check whether elements like colour, typography and imagery are used consistently throughout the site.
Is the site simple and straightforward?
There’s nothing worse than a site with information overload. You don’t want to overwhelm or confuse your visitors. The website design should be clean and easy-to-navigate, whilst still making an impact. Ensure that the web pages are not only beautiful, but clutter-free too.
How is the content presented?
Your website’s content is a crucial part of your site. Make sure that text, images and videos are used effectively.
Will the site look good on mobile, tablet, and desktop devices?
Ask your designer how the UI will be translated across various devices. Your website needs to look good across screens of all shapes and sizes.
If you plan to present the UI to key stakeholders or investors, it might be a good idea to translate the finalised UI into what we call a high-fidelity prototype.

What is a prototype?
A prototype is an interactive mockup that demonstrates how the website will work. The cool thing about prototyping is that it can happen at any stage during the process. You can even create a prototype from sketches, or from a low-fidelity wireframe! Prototyping is a powerful way to test out ideas and get feedback before developing the final solution.
A high-fidelity prototype closely resembles the final website in terms of design and functionality. There are tons of benefits to building these types of prototypes. We’ve included some below:
Gives a realistic view
A high-fidelity prototype gives your entire team a realistic view of how the final product may look.Get feedback quickly
These prototypes are a great way to test your site on key stakeholders and users. There’s no faster way to find out which plans are likely to work, and which may be problematic.Get key stakeholder support
It’s far easier to sell your idea to the big bosses when they have a prototype to interact with.Focus on user experience
A high-fidelity prototype allows you and your team to get a better idea of how it may feel to interact with the final site.
Step 9: Let the web developers work their magic!
Now it’s up to your team of developers. There are three major steps in the development process:
Development
Once the design is completed and you’ve given it the thumbs-up, developers (or “dev’s” as we like to call them) transform the elements into an interactive interface that your users will see and interact with.
Developers are also in charge of adding transitions, interactions, and other effects to your site. Details like these can really help make content understandable, usable, and engaging. It’s also important that developers pay particular attention to page load speeds. The faster the site loads, the better - not only for the enjoyment of your users - but also for your ranking on search engines like Google!
Quality assurance
This is where designers and developers check everything is working as it should. The site is painstakingly checked across browsers and devices to make sure there are no kinks or bugs. When I say bugs I don’t mean those creepy crawlies that keep you up at night. We’re talking about errors and flaws on your website that behave in unintended ways and affect usability.
Debunking the “bug-free myth”:
There is no such thing as building a bug-free website. Why? Well, it’s important to remember that no software is perfect. Bugs can crop up for many reasons, at any given time. Companies like Facebook, Intel, and GitHub even pay people when they report a bug! The moral of the story, ensure your site is constantly tested and improved. That’s the only way to curb those nasties.
If the site is a redesign, now is the time for the developer to ensure all the SEO-goodness from the old site is transferred to the new site. Here’s where they migrate all the existing content that has already built SEO value e.g. blog posts, title tags, meta descriptions, internal links etc to the new site.
Launch
Before launching your site to the world, it may be wise to conduct a round of usability testing to ensure that everything is in working order and to get some final feedback.
Once everyone is satisfied choose the best day to launch and use your awesome marketing brain to put together a launch strategy. Spread the word through email campaigns, social media, press releases and promotions. Make the most of this opportunity! After all, you’ve got it, so you may as well flaunt it ;)
Step 10: Make continuous site improvements
Remember, a website is never truly “done”. Peak-performing websites only exist because of continuous tweaks and optimisations. Keep a close eye on your analytics, ask for feedback from your users, and make adjustments based on the data received. Keep those SMART goals in hand and continue to refine and improve your site as time passes.
I recommend including ongoing improvements and maintenance in your marketing budget. That’ll ensure your website is always nurtured and cared for. Remember: maintain, iterate and grow!
Want to find out more about continuous improvement? Check out our blog post: I have a new website, now what?
Start your website design or redesign today!
Wowee! You made it. I know that was a mouthful, but if you take the time to apply these steps to your website process it’ll be totally worth it.